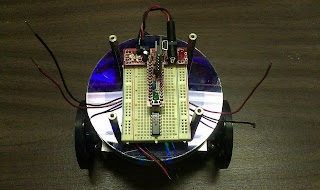
This is the part of the build which concerned me the most. The physical aspect of getting things put together in a way that would work is primarily what has kept me from building a bot in the past, so this was also one of the more exciting aspects... the hump, so to speak.
The first matter of business was to fashion some manner of mounting the servos. I found some servo brackets that I could order online, but I really did not want to spend the money nor wait the time to receive them. I can do this, right? Looked at the typical stores like Home Depot and Lowe's for some angle brackets that would work. Nothing. Finally, I settled on a three-foot length of 1" x 1" x 1/16" aluminum angle and decided that I could cut and drill my own brackets. I used a cheap mitre box and a hacksaw to cut the brackets 3/8" wide. Then I placed the servos onto the brackets and marked where to drill the holes.
One important aspect to remember is to mount your servos reverse from each other. Once this was accomplished, I marked and drilled the base CD so that I could attach the servos and other mechanical parts. The pictures here were my first pass. After dealing with a serious lack of prior design and the many factors that followed, such as not easily being able to remove the battery holder while the robot was assembled, I eventually re-fit and re-drilled my parts placement. As you will see in a later post, I saved some holes by running the layer standoffs vertically from the servo brackets. This worked very nicely. Also, I later decided to drill two through-holes for the wires instead of trying to run them all through the center holes of the CDs.
Once the base was built, I placed the controller protoboard on top and had a look to see if everything fit. Basically, I think we're off to a good start and at this point, I felt like I was past the hardest part.
Monday, May 10, 2010
Subscribe to:
Post Comments (Atom)


No comments:
Post a Comment